2.09.2009

Pittsburgh


This is an HDR Panoramic shot of Pittsburgh from the top of Mt. Washington. I was up there Saturday night and I took 5 bracketed shots for a total of 15 images. I then made 3 different panoramic images of the city using photomerge in photoshop. I then put all three images in the same file as different layers and realigned them. Then, I saved them out and created a high dynamic range image using photomatix. I used their tonemapping feature and saved it out as a 16 bit tiff. I brought it back into lightroom and made a few adjustments in lightroom and photoshop before saving it out for web.

Canon 40D (RAW)
different settings @ ISO 100
17mm (17.0-50.0mm f/2.8 Tamron)

12.21.2008

Jam Party


We went to a party at the Armadillos' house and the band was playing in the basement. There were only a few small lights on and it was almost impossible to take photos without the flash. In the end I just enabled the extended ISO and shot at 1/60s and 3200 ISO. There was a lot of noise and the images are pretty soft, but I was able to capture the natural lighting and mood. All I did was adjust the levels a bit and reduce the noise and sharpen. Let me know what you think.


Canon 40D (RAW)
1/60 sec at f/2.8, ISO 3200
17mm (17.0-50.0mm f/2.8 Tamron)

Adjustments made in Lightroom:
- Basic adjustments, tone curve, clarity, contrast, desaturation,

Adjustments made in Photoshop:
- Noise Ninja
- high-pass sharpening
- slight output sharpening and border

9.30.2008

High Key Portrait


My first attempt at "high key" photography. I tried to get as much light as possible with all the lamps I had lying around... I feel like I could use real studio lighting though. My goal was to take an image that was over exposed but not blown out. Also, I wanted to make the background lighter than the foreground. Since that didn't work out, I had to extract her in photoshop and put her on a new background.

I did most of the initial desaturation (except blue of course) and exposure adjustments in lightroom. Then I brought her into photoshop and cut her out. I found myself exploring around photoshop trying to figure out how to remove the background from within her hair. I think I had more layers with different blends and opacities than probably any of the other photos I have posted.

Canon 350D (RAW)
1/80 sec at f/5.6, ISO 200
21mm (17.0-50.0mm f/2.8 Tamron)

Adjustments made in Lightroom:
- Camera Profiles, Basic adjustments, tone curve, clarity, contrast, desaturation,

Adjustments made in Photoshop:
- Noise Ninja
- extracted the model
- blended onto the new background
- used the spot healing brush
- dodged and burned
- two rounds of high-pass sharpening technique (only on the eyes and mouth)
- slight output sharpening and border

9.28.2008

Praying Mantis


This praying mantis was hanging out on my grill on the front porch. I tried a number of different techniques but in the end I just got as close as a could and used a direct flash.

I haven't been playing too much with Photoshop lately and I feel like I'm starting to loose a little proficiency in editing my photos. Anyway, my new technique that I used on this photo is the camera profiles in Lightroom 2.o. This is a new feature with the release of lightroom 2.0 and these profiles allow you to mimic the raw conversion of your camera manufacturer. In this case I used the Canon Portrait profile. This gave me the best starting point to edit the photo and saved me a lot of time. Choosing a camera profile is now going to be one of the first steps in my RAW workflow.

I think for my next project I'm going to try to take some portraits. I'm hoping that by writing this it will hold me somewhat accountable and force me to follow through.

Canon 350D (RAW)
1/200 sec at f/10, ISO 100
300mm (70.0-300.0mm f/4-5.6 IS Canon)

Adjustments made in Lightroom:
- Camera Profiles, Basic adjustments, tone curve, clarity, contrast, saturation,

Adjustments made in Photoshop:
- Noise Ninja, and Photokit Capture sharpening
- Adjusted saturation and white balance
- High-pass sharpening technique
- Slight output sharpening and border

7.10.2008

What kind of bird am I?


This was taken near a redwood forest outside of San Francisco. Someone told me what kind of bird this was but I have since forgotten. I would really like to find out what kind of bird this is, so if anyone knows please tell me.

I used the high-pass filter technique to sharpen just the bird. I duplicated the layer and applied a high-pass filter and set the blend mode to overlay. I then masked the layer and revealed just the bird.

Canon 350D (RAW)
1/320 sec at f/6.3, ISO 100
300mm (70.0-300.0mm f/4-5.6 IS Canon)

Adjustments made in Lightroom:
- Basic adjustments, tone curve, clarity

Adjustments made in Photoshop:
- Noise Ninja, and Photokit Capture sharpening
- High-pass sharpening technique
- Slight output sharpening and border

7.09.2008

Red White and Boom!


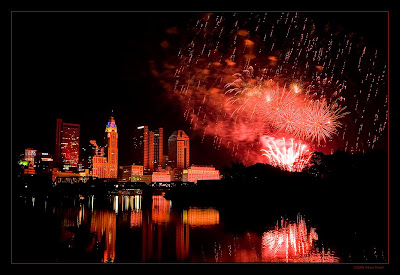
This is from the Columbus red white and boom fireworks show (from two years ago though). This was one of the first photos that I thought through and planned before taking. I like how the red light is reflected off of the city. It is one of my favorite photos and really helped motivate me to get better at photography.

To take this picture I setup the camera on a tripod and focused it. Then I used a wired remote to open the shutter with the bulb mode. I then used one of my sandals and held it in front of the lens until a firework went off. I removed the sandal for a few seconds and then put it back until the next one went off. It was a bit of trial and error, but I got a few good captures.

I did up the saturation a little bit, but the colors are pretty close to what the camera actually captured. If the colors look too saturated on your computer, it's probably because your browser can't read color profiles. I also burned in a little of the smoke to make the sky look darker and I dodged the buildings to lighten them up. I did this with 50% gray overlay layers instead of using the dodge and burn tool.

Canon 350D (RAW)
bulb at f/7.1, ISO 100
25mm (17.0-50.0mm f/2.8 Tamron)

Adjustments made in Lightroom:
- Basic adjustments, tone curve, saturation and vibrance

Adjustments made in Photoshop:
- Noise Ninja, and Photokit Capture sharpening
- Dodged and burned using a 50% gray layer and overlay blend. Then you just paint white or black to lighten or darken the image
- Slight output sharpening and border

7.01.2008

Frosted Mini-Wheat


A picture taken on our honeymoon of the flooding in southern Ohio. It looks just like a frosted mini-wheat, right? The only unique thing I did to this picture is I reduced the saturation quite a bit and then cranked the contrast.

Canon 350D (RAW)
1/250 sec at f/8, ISO 200
70mm (70.0-300.0mm f/4-5.6 IS Canon)

Adjustments made in Lightroom:
- Basic adjustments, tone curve, desaturated all the colors evenly
- Also used the split toning, highlights have a cool blue tint, shadows have a yellow brown tint.

Adjustments made in Photoshop:
- Noise Ninja, and Photokit Capture sharpening
- Slight output sharpening and border

6.29.2008

Looking Down


I've been using the workflow that I described in my last post with a few additions. First I have been using a new way to sharpen certain parts of the image. I duplicate the background layer and the use the high pass filter. In this case I adjusted the settings so that all the detail on the snail came out and ignored the rest. Then I masked the layer and only revealed the snail hiding the rest. Then I set the blend mode to overlay. I like the way the high pass sharpening works better than the photokit sharpener does. I still need to experiment a little more with how to sharpen stuff for print.

Another thing I am doing different is using layers for everything, including simple image adjustments in photoshop. This prevents me from ruining any of the pixels on the original image so I don't have to go back to the raw file if I don't like something in photoshop.

Lastly, if you do not have color profiles enabled on your browser you are probably not seeing exactly what I'm seeing when I adjust my photos. Firefox 3 now has support for color profiles, but you'll have to enable them, so do it.

Canon 350D (RAW)
1/125 sec at f/5.6, ISO 200

300mm (70.0-300.0mm f/4-5.6 IS Canon)


Adjustments made in Lightroom 2 beta:
- Basic tone, Brightness/Contrast, Clarity, Vibrance, Post-crop Vignetting

Adjustments made in Photoshop CS3:
-Noise Ninja, Highpass sharpening, Levels, Multiply blend with an adjustment layer, Output sharpening with Photokit, Border action.

6.25.2008

A Cow's Dream


I'm going to try to post more regularly now. Although I just had my camera sent in to be fixed... Oh well. This is another shot from our California trip that is up north on the coast in wine country. I've been playing with different creative filters lately. This is a preset that I downloaded from Matt Kloskowski's web site and modified a little.

I have finally developed a workflow that I think I can use to help me get more consistent results without bumbling around between photoshop and lightroom like a goof. I shoot all RAW and I manage all my photos in lightroom. After I select which photos I'm going to work on in lightroom I go through the develope module pretty much from top to bottom. I apply no sharpening or noise reduction there. Then I edit a 16 bit prophoto RGB tiff in photoshop. I apply noise ninja first. If I haven't done much to the image I use the camera profiles from their website. Otherwise I will manually profile the image. Then I use capture sharpening from pixel genius called photokit sharpener. This is a very mild sharpening that helps correct some of the softening from the raw conversion. Here is where I do all the photshop work. Sometimes I just get rid of a little dust and I'm on my way, other times I spend quite a bit of time here. When I get the image to where I like it I usually convert to an 8 bit and sRGB colorspace. The 8 bit allows me to use more of the photoshop filters and the sRGB takes up less space (The lab where I go uses sRGB only) When I'm done I save this file back to lightroom and group it with the original RAW image. Now if I want to post the image online or get a print I find the image in lightroom and open it in photoshop. Here I change the size of the image, use output sharpening depending on where its going and then if I'm going to post it online, I have an action that I use to put a border around it. I then save this file somewhere else because every application and size of the final print needs a different file.

Canon 350D (RAW)
1/200 sec at f/5.6, ISO 100
41mm (17.0-50.0mm f/2.8 Tamron)

Adjustments made in Lightroom:
- Used 'Matt's Sin City - Dark Red' preset
- Then adjusted Levels, Crop, Tone Curve, Clarity, HSL and saturation

Adjustments made in Photoshop:
- Noise Ninja, and Photokit Capture sharpening
-
Duplicate background layer using the multiply blend, then lowered the opacity
- Further adjusted levels, brightness and contrast

5.12.2008

HDR Sunset


6/25/2008 I redid the HDR using photoshop to merge the images and the new photomatix to tone map. I also changed the crop and played with a few other things. Take a look and let me know which one looks better.


This is the first HDR shot that I have done. Again this image was taken on the beach in San Francisco. I used bracketing on my camera at +/- 2 EV. This gave me three images that each exposed a different part of the picture correctly. The water, sunset and rocks where all at very different light levels. I used photoshop to make the HDR image but I used photomatix to actually do the tonemapping and 8 bit output. I tried to give this image a slightly surreal look without going so far to make it look fake. Let me know what you think.

Canon 350D (RAW)
1/15, 1/60, sec at f/11, ISO 400
50mm (17.0-50.0mm f/2.8 Tamron)

Adjustments made in Lightroom:
- Levels, Tone Curve, Clarity, Saturation, Vibrance

Adjustments made in Photoshop:
- Used bridge to merge photos to HDR
- Opened photos in photomatix and used tone mapping slidders.
- Brought the photo back into photoshop and applied Noise Ninja, saturation, and a little rubberstamping for dust

5.11.2008

Beach


This is another panoramic shot that I took on the beach in San Francisco. This time I used the same exposure settings so that it would blend better. I adjusted the middle image in Lightroom and copied the settings and applied them to the other 5 images. I would like to have done this in HDR so that I could have brought out the sunset.

Canon 350D (RAW)
1/30 sec at f/8, ISO 100
17mm (17.0-50.0mm f/2.8 Tamron)

Adjustments made in Lightroom:
- Levels, Tone Curve, Clarity, Saturation, Vibrance
- Synchronized all the settings across all images

Adjustments made in Photoshop:
- Used bridge to add the photos to photomerge
- Noise Ninja, Crop, Saturation

5.09.2008

Beach Birds


This was the third day of our trip to San Francisco and we were on the beach near Golden Gate Park. It was late in the evening and we were there to watch the sunset. There were these two birds that were fighting. They kept on swooping and attacking each other in the air. I think one is a seagull (or as Mr. Pignato would say "garbage duck") and the other might be a crow.

Canon 350D (RAW)
1/800 sec at f/10, ISO 400

150mm (70.0-300.0mm f/4-5.6 IS Canon)


Adjustments made in Lightroom:
- Levels, Brightness/Contrast, Clarity, Saturation

Adjustments made in Photoshop:
-Noise Ninja

5.06.2008

Golden Gate


I've been gone for the past week on vacation. See if you can guess where we went. The last night we were there, Molly and I went to the Marin Headlands to see the Golden Gate Bridge and the city at night. The fog started to roll in just as it got dark. I was able to get the picture off before the entire bridge disappeared. Just a couple of minutes after I took this picture, you couldn't even see the top of the first tower.

Canon 350D (RAW)
30.0 sec at f/13, ISO 100
17mm (17.0-50.0mm f/2.8 Tamron)

Adjustments made in Lightroom:
- Levels, Tone Curve, Clarity
- Only tweaked the settings, no major changes

Adjustments made in Photoshop:
- Noise Ninja, and slight sharpening
- Crop
-
Duplicate background layer using the multiply blend, then lowered the opacity

4.26.2008


This is our dog Nola playing in the Olantangy River. In the late summer the river gets so low that she can run all the way across it. This picture was taken at the end of last July. I've been trying to work on action photography for a while now. It's harder than I originally thought. I like this picture and the only things I would have done different would be to use a faster shutter speed and bring the focal plane closer. But those are minor things I'll work on in the future. This picture didn't need too much work. A little more noise than I like (but that's 800 ISO) and some harsh shadows that lost detail.

Canon 350D (RAW)
1/80 sec at f/5.6, ISO 800

190mm (70.0-300.0mm f/4-5.6 IS Canon)


Adjustments made in Lightroom:
- Levels, Brightness/Contrast, Tone Curve, Clarity

Adjustments made in Photoshop:
-Initial capture sharpening, Noise Ninja

4.24.2008

Coskata Pond


This is Coskata Pond on Nantucket. It is only accessible by driving on the beach. This series of photos were taken almost two years ago while on our way to Great Point to watch the sunset. I had originally taken them with the purpose of a panoramic but I never actually stitched them together until now.

This photograph is composed of 6 different photos taken in series. I hand held the camera and didn't shoot in manual. So of course my camera picked different apertures and shutter speeds for different shots. The picture needed a lot of work to bring out the sky and water. I'm overall happy with how it came out, but I think I would do a bit more work before I consider printing it.

Canon 350D (RAW)
variable, ISO 800

41mm (17.0-50.0mm f/2.8 Tamron)

Adjustments made in Lightroom:
- Levels, Brightness/Contrast, Tone Curve, Clarity
- The main goal I had was to make all the pictures look as if they had the same exposure settings that way they would merge well.

Adjustments made in Photoshop:
- Stitched all 6 images together in photomerge to create a 35 megapixel image.
- Crop
- Added two layers each with its own mask. One for the sky and water, and the other for the land. First I made the land mask and then inverted it for the water and sky. The land I lightened up via lighten blend while the sky I added contrast and a little saturation via multiply blend. Then I adjusted the opacity and made sure everything blended together well.

4.23.2008

Meet Barack


This was taken a little over a week before the Ohio primary at OSU. I took pictures for an hour and half and didn't get any that I really liked. As he was walking out, just before the exit, I got this shot. I had never been to a political rally before and it was quite the experience. I'm glad I got to see Obama and listen to him speak in person.

Since we were in an old gym you can imagine how terrible the lighting was (Dim and very yellow). I was really struggling with whether I should use 1600 iso or not. Obviously 1/80 sec is way too slow for a 300mm zoom even with image stabilization (IS). On top of the bad lighting, the girl's flash drained most of the contrast and any real color saturation from the capture. Despite all the problems with this photo, I'm glad I decided to try and fix it up.

Canon 350D (RAW)
1/80 sec at f/5.6, ISO 800

300mm (70.0-300.0mm f/4-5.6 IS Canon)


Adjustments made in Lightroom:
- Levels, Brightness/Contrast, Tone Curve, Clarity, Grayscale Color Mix, Slight Vignetting.
- I worked on a new technique with Split Toning in Lightroom. I tinted the highlights yellow to warm up the lighting (take a look at the flash). Then I tinted the shadows a cool blue. It's an interesting subtle effect that I hope shows up on the web.

Adjustments made in Photoshop:
-Initial capture sharpening
-The image had a huge amount of noise from both the high iso and the slight underexposure. Noise Ninja is the best noise reduction program/plug-in ever.
I created a custom profile using areas of solid tone in the image and it really did a fantastic job without loosing too much detail.
- I also duplicated the background layer, added it via multiply and reduced the opacity. I do this almost all the time now to some extent or another.
- After reducing the image size I did a little output sharpening and added my border thing.

4.21.2008

Spring Buds


This was taken a few minutes ago in my back yard. It is harsh late evening lighting that I thought was interesting. I didn't do any significant editing to this one, just tweaked a bunch of settings.

Canon 350D (RAW)
1/500 sec at f/7.1, ISO 200

225mm (70.0-300.0mm f/4-5.6 IS Canon)


Adjustments made in Lightroom 2.0 Beta: Levels, Tone Curve, Clarity
Adjustments made in Photoshop: Noise Ninja, Output Sharpening, Duplicate background layer using the multiply blend, then lowered the opacity for a slight bump in contrast and color

4.20.2008

Abandoned


This was taken in the small town of Rockbridge, OH. Our car was actually in about 4 - 6 inches of water as we were driving by. I think this house may have been flooded a few times before.

Canon 350D (RAW)
1/250 sec at f/8.0, ISO 200

17mm (17.0-50.0mm f/2.8 Tamron)


Adjustments made in Lightroom: Crop, Levels, Tone Curve, Clarity, Grayscale, Split Tone, Sharpening, Noise Reduction
Adjustments made in Photoshop: Noise Ninja, Burned the sky, Duplicate background layer using the multiply blend, then lowered the opacity for a slight bump in contrast and color.

4.19.2008

Spring Icicles


This is in Hocking Hills near Old Man's Cave. I shot this on our honeymoon last month. The Valley we were in had a lot of shade and was at least 10 degrees cooler than above. Thats why there was still ice and I had to use 400 iso.

Canon 350D (RAW)
1/160 sec at f/5.0, ISO 400

50mm (17.0-50.0mm f/2.8 Tamron)


Adjustments made in Lightroom: Crop, Levels, Tone Curve, Clarity, Vibrance, Sharpening, Noise Reduction
Adjustments made in Photoshop: Noise Ninja, Mask revel a copy of the background that was blurred with the lens blur filter.

4.18.2008

Lonely Pete


This picture is of Tammy's cat Pete, who is begging for attention. Taken with a direct flash from ground level.

Canon 350D (RAW)
1/320 sec at f/4.0, ISO 400

50mm (17.0-50.0mm f/2.8 Tamron)

Canon Speedlite 380 EX Flash


All adjustments made in Lightroom 2.0 Beta: Crop, Levels, Clarity, Vibrance, Sharpening, Post-crop Vignette